How to Chlorinate a Well (4″ or larger in diameter)
- Set your water treatment equipment on bypass, if you have a reverse osmosis system shut off the water inlet valve.
- Switch off the electric breaker or disconnect that powers the well.
- Remove the cap from the top of well. Three or four screws around the top should release the cap, if the well has a large thread on cap or nut in the middle of the cap do not attempt to remove the cap, contact Buer Well Drilling.
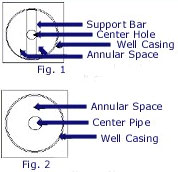
- We recommend one gallon of household unscented bleach for most chlorinations. Pour the bleach into the annular space between the support bar and well casing ( see figure 1 & 2). If there is a small 1/4″ size plastic tube in the annular space near the top of the well do not pour in the bleach, contact Buer Well Drilling for assistance. Do not pour chlorine into the center hole & try to keep the bleach off the wire connections.
- Turn the power back on to the well.
- Hook a garden hose up to an outside faucet with enough hose to reach the wellhead. Turn the faucet on and run water into the annular space of the well where you poured the bleach. Run for 10 minutes, if the well fills up and water runs over the top your well has a drawdown seal and you need to contact Buer Well Drilling for assistance. If the well hasn’t filled up check the hose to see if you can smell chlorinated water. If chlorine is present you are ready to complete the chlorination process.
- With the hose still running into the well turn on each individual faucet inside & outside the house on until you smell chlorine then shut them off to keep the chlorinated water in the plumbing lines. When you’ve completed this step shut off the outside faucet that is running water into the well and reinstall the well cap securely on the well. Let the water in the plumbing lines sit for a minimum of 12 hrs. Do not drink, bathe, wash clothes, or cook with the chlorinated water. It is harmful if consumed, and can burn the skin if contacted, & damage clothing.
- The following day hook two hoses to outside faucets if possible and run the chlorinated water to waste until no chlorine smell is present. Do not pump the chlorinated water onto plants or surfaces that could be damaged by chlorine. Turn off the outside faucets and run each individual faucet in the house until no chlorine is present. If you are taking water samples for bacteria start with Step #3 of how to draw water samples. You can now take the water conditioner off bypass and turn the water back on to the Reverse osmosis unit. Pour 1/2 cup of bleach into the brine tank so it can disinfect the softener on the next regeneration cycle. The water should now be ready for normal use.
How to draw water samples for Coliform bacteria testing
- Make sure your water conditioner is on bypass.
- Connect at least one hose to an outside faucet, two faucets with hoses is better if you have a submersible pump. Make sure if you have chlorinated your well, or are pumping out a new well that was chlorinated, that all the residual chlorine is gone before you take samples or your samples won’t be accepted by the lab.
- Shut off the outside hoses. Go to the sample tap faucet in the basement next to the pressure tank. Sanitize the faucet by wiping with bleach or warming with a lighter hot enough to kill bacteria.
- Run at least 10 gal. of water through the sample faucet into a bucket to purge the faucet.
- Turn the sample tap on about 1/2 open and running into an empty bucket while you draw the samples. It’s best not to turn the faucet on & off with each sample but to let it run steady while drawing samples. Make sure your hands are clean, do not touch the lip of the bottle or the inside of the cap, and do not breathe on the bottle.
- Fill the sample bottles to the fill line, do not rinse out the bottles because there is a chlorine neutralizing powder in the bottles.
- Turn off the outside faucets that are running and switch the water conditioning equipment from bypass to service.
- Make sure the sample bottles stay refrigerated because the lab will temperature scan the bottles before they accept the samples. Deliver the bottles to the lab within 24 hours of drawing samples so the lab has time for testing without exceeding the allowable hold time for bacteria samples.